MASTIC FOR CAKE DECORATION
general rules + 3 recipes
General rules for the preparation and use of cake mastic.
1. Powdered sugar for mastic should be very finely ground. If there are sugar crystals in it, the layer will tear when rolling. Depending on the type of candy, you may need much more powdered sugar than indicated in the recipe, so you need to stock up in large quantities in advance. If the mastic remains sticky for a long time during mixing, then you need to mix in the powder until you get the desired consistency.
2. Mastic coating should NEVER be applied to a wet base - to soaked cakes, to sour cream etc. The mastic dissolves quickly from moisture. Therefore, there must be a “buffer layer” between the fondant and the cake. This could be marzipan or a thin layer of buttercream. If you are using buttercream, then before applying the mastic, you need to let the cake sit in the refrigerator until the cream hardens.
3. To glue different parts of mastic figures or to glue decorations onto a mastic coating, the gluing area should be slightly moistened with water.
4. When exposed to air for a long time, the mastic dries out. Some figures, for example, flowers, cups, spoons, plates, tables and chairs, are best made in advance and allowed to dry well.
5. Three-dimensional figures, such as flowers, must be attached to the cake shortly before serving, otherwise, if you attach them and put the cake in the refrigerator, they begin to absorb moisture from the environment and fall off.
6. Attention! If there is high humidity in the room, the cake covered with mastic may become covered with condensed moisture after being removed from the refrigerator. In this case, it is advisable to serve it immediately from the refrigerator to the table. If you still need time before serving, you can carefully blot the moisture from the mastic with a napkin. Or place the cake under a fan.
7. Marshmallow figures can be decorated with food coloring on top.
8. If the mastic has cooled down and began to roll out poorly, then it can be slightly warmed up in microwave oven or in hot oven. She will become plastic again.
9. You can store unused mastic in the refrigerator (1~2 weeks) or in the freezer (1~2 months), after wrapping it in plastic film.
10. Finished dried mastic figures should be stored in a tightly closed box in a dry place. These figurines can be stored for several months.
Ideas for decorating cakes in an album:
MASTIC FROM MARSHMALLOW
Marshmallows are an English-American sweet. They have nothing in common with our marshmallows, although the name “marshmallow” is often translated into Russian as “marshmallow”.
Marshmallow fondant is very pleasant to work with.
It easily takes the desired shape and does not stick to your hands, rolls out well and is painted evenly.
When purchasing candy, the name does not have to be "Marshmallows". It is enough that the name contains the combination "..mallows.." or "..mallow..". For example, "Chamallows", "Frutmallows", "Mallow-Mix", "Mini Mallows", "Banana Mallows", etc. In Russia, marshmallows are produced by the Nestlé company - “Bon Pari, Tutti-frutti soufflé” and “Bon Pari soufflé”.
Two ways to make marshmallow mastic
Method 1:
Compound:
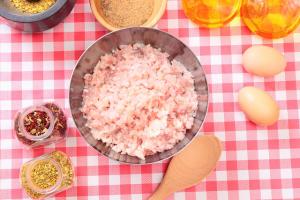
- marshmallows - 90-100g (one pack of marshmallow candies)
- lemon juice or water - ~1 tbsp. spoon
- powdered sugar - ~1-1.5 cups
Preparation:
Marshmallows are most often sold in more than one color.
It is best to buy white marshmallows.
Divide the marshmallows by color - place the white halves in one bowl and the pink halves in another. Add a tablespoon to marshmallows of the same color lemon juice or water and heat in the microwave (10-20 seconds) or in a water bath until it increases in volume.
If you want to tint the mastic with food coloring, it is better to add it after you have taken the swollen and melted marshmallows out of the microwave. At this point you need to add the dye and mix the mass well with a spoon.
Then add sifted powdered sugar in portions and stir the mixture with a spoon or spatula. When it becomes difficult to stir with a spoon, pour the mixture onto the sprinkled powdered sugar table and continue kneading with your hands until the mastic stops sticking to your hands.
Wrap the resulting mastic in cling film (the film should fit tightly on all sides to the mastic so that air does not get inside the bag) and put it in the refrigerator for about 30 minutes.
Remove the finished mastic from the refrigerator, place it on a table sprinkled with starch and roll out thinly.
From the finished mastic you can make various figures, flowers, leaves, or cover the cake with a thinly rolled mastic sheet.
Method 2:
Compound:
- marshmallow - 100 g
- butter - 1 tbsp.
- powdered sugar - 200-300 g (you may need more or less powder)
- food coloring
Preparation:
Place the marshmallows in a mold, add butter, and microwave for 15-20 seconds.
The marshmallow should increase in volume.
Add 50-100 g of powdered sugar, mix.
If you are making colored figures, divide the resulting mass and add food coloring.
Add powdered sugar until you get a mass similar in consistency to plasticine.
The mastic is ready. You can roll it out and cut out various shapes.
Finished products are dried within 24 hours.
Finished products should not be stored in the refrigerator.
If you have any unused mastic left, wrap it in cling film and put it in the refrigerator.
If the cake is covered with cream, then it should be decorated with mastic products before serving.
MILK MASTIC
Take a glass of powdered sugar, a glass of milk powder and a can of condensed milk.
All ingredients are kneaded to a state close to soft plasticine.
As the simplest dye, you can use cocoa powder; depending on its quantity, you can get a more or less rich chocolate shade.
Recipe: mixed condensed milk with dry milk and dripped yellow dye. Everything kneads wonderfully and does not stick.
I supplement the recipe at the request of workers. My husband said that it is not quite sweet, I think you can add powdered sugar along with dry milk-) THIS IS IMPORTANT! For those who like it sweeter.
For 1 cake: 1 can of condensed milk, 1.5 cups of milk powder, dyes + powdered sugar.
CHOCOLATE MASTIC
I tried many times to make ordinary mastic and all sorts of “things” from it. Yes, it worked, but.....
I don’t know, maybe my hands are not from there... but I really didn’t like the process itself, because everything around is covered in powdered sugar, for the time being it sticks to my hands, and the finished mastic and all sorts of roses freeze like stone, and no taste.
But I want to create all kinds of beauty in such a way that it is simple, tasty and beautiful!!
And I found what I was looking for! Now I advise you too!!!
It's a pleasure to do it. No dirt.
It molds perfectly and takes the desired shape, and at the same time it is also very tasty (I ate a little while I was making it).
Ingredients:
- Dark chocolate— 100 g
- Marshmallow (color does not matter) - 90 g
- Cream (30%) – 40 ml
- Butter - 1/2-1 tbsp. l.
- Cognac - 1-2 tbsp. l.
- Powdered sugar - 90-120 g
Preparation:
Place the chocolate broken into pieces into a saucepan and place over low heat.
Melt completely.
Without removing the saucepan from the heat, add marshmallows to the melted chocolate and constantly mix the mixture well with a spoon.
When about half of the marshmallows have melted, pour in the cream, add butter and cognac.
Stir continuously until a homogeneous thick liquid mass is obtained.
Remove from heat.
Constantly stirring with a spoon, gradually add sifted powdered sugar.
When the mass turns out to be too thick and elastic and it is no longer convenient to stir with a spoon, do it with your hands.
Add powdered sugar until the mixture feels like warm, tight, elastic dough.
It does not stick to your hands at all - on the contrary - your hands remain clean, but greasy.
Roll the mixture into a ball and place on baking paper.
The mastic is ready.
It turns out barely warm, very soft and tender.
You can store it tightly closed in the refrigerator, and warm it slightly in the microwave before next use.
Before I started making the cake, I looked on the net for all possible ideas, both cakes and figurines... I looked through a lot of owls)
And I chose this suvushka, I liked it
After I decided on the type of owl to choose, I started baking the cakes. Sand cake with with different fillings from Tanya Brusniki.
So, let's get to work.. The well-cooled cakes, before spreading them with cream, I thoroughly soaked them in cognac syrup so that the cake would become soft as quickly as possible. And put it in the refrigerator for soaking.

From the remains of the cakes and cream (butter and sour cream with different fillings (I used dried apricots with nuts)) I made a “potato” dough - a mass for leveling the cake. After which I again put the cake in the refrigerator to soak for a couple of hours. After the cake was well soaked, we leveled the shape of the cake well, I tried to make the shape symmetrical (it’s easier for me this way), and made the owl’s face flatter! And coated it well with cream (oil + white chocolate) and again sent my Owl to the refrigerator. (I would like to draw your attention to the fact that the butter would harden well - I wasn’t very lucky and the butter wouldn’t harden at all and the mastic would simply slide off the cake)

While the cake was cooling in the refrigerator, I little by little began to make feathers for the owl. The color I chose was white (chest, muzzle and some wings), white-gray (part of the back, neck and wings) and gray (back and under the wings)
The relief of the feathers was made using a homemade mold, and the shape of the feather was part of the shape of a mushroom

Having taken the Owl out of the refrigerator, I had to remove the unfrozen layer of butter (((and start decorating the owl - putting on the feathers. I glued the bottom layer of feathers tightly to one another so that there were no gaps and the cream was not visible.

During breaks in cooling the owl I made wings and an owl's face...
First of all, I cut out 2 wings of the required size and shape for our owl.. I greased the top of the wing with glue (mastic with water) and glued the leaves.. and this is what 1 finished wing looks like..
I made the owl's face in several stages. 1. made the eyes, 2. the basic shape of the muzzle, 3. feather bags under the eyes. 4. beak and eyebrows.. I did everything on oilcloth, as the mastic stuck to other surfaces. Before gluing the muzzle I let it dry a little.

We cover the back, breast, and under the wings of our owl with feathers... alternating different colors of feathers.
After all this, we start gluing our wings! Pre-prepare small stands (ordinary cellophane bags worked very well for me) for the wings so that they do not slide to the bottom under the weight.. After I glued the wings, I tried to continue as quickly as possible before gluing the remaining feathers on the neck and head of the owl so that the wings would be glued as tightly as possible to the bulk of the feathers

After which I tried on the muzzle in order to check if there were any gaps between them, after which we glued the muzzle and made legs for our owl and our owl is Ready!!!
In addition, I’ll add - don’t forget to add white highlights in the eyes to make the owl more alive..
Making an owl cake is much easier than it might seem at first glance. If desired, it can be decorated with cream or mastic. In both the first and second cases, they will be suitable as a basis sponge cakes with different impregnations.
Cake base
To prepare the sponge cake we need to break 2 chicken eggs, preferably chilled, in a deep bowl. Add 150 g to them. sugar and beat well with a mixer until foam forms. During the beating process, you need to gradually add 150 grams. flour and 10 gr. citric acid. Add vanilla to taste. Beat until smooth so that there are no lumps. Pour the finished mixture into a round mold, previously greased with butter. Place the form in the oven. The oven must be preheated to 180 degrees. On average, the cake is baked for about 40 minutes, but more is possible.
After you remove the cake from the oven, you need to cool it. While the cake is cooling, start preparing the cream.
If desired, you can prepare cottage cheese or sour cream. We use milk as impregnation.
After the cake has cooled, cut it into three parts. We soak all the cakes and spread them evenly with cream. Place the coated cakes in the refrigerator for a couple of hours. Let's start decorating the owl cake. If desired, you can decorate with cream or mastic. Let's consider both options.
Cake "Owl" made from cream
To decorate such a cake, you will need to prepare two types of cream:
- chocolate-creamy;
- creamy.
We will also need chocolates with glaze and round chocolate or regular cookies.
To prepare the first type of cream, take 100 g. dark chocolate and melt it in a water bath. In a separate saucepan, bring 110 ml of cream to a boil, adding two tablespoons of powdered sugar. Then pour hot cream into the melted chocolate, leaving to cool for 3 minutes at room temperature. Add 35 gr. butter. Now the cream can be mixed and placed in the refrigerator.
Prepare the second cream from 100 ml of milk, 250 g. butter, 200 gr. powdered sugar and one packet of vanilla sugar. Mix all ingredients with a mixer until smooth and place in the refrigerator.
Now we proceed to the stage of decorating the owl cake. We take out sponge cakes coated with cream and begin to draw an owl on them using a pastry bag. Coat the top layer with butter cream. We cover the owl's body with cookies. After this, using a pastry bag, we begin to draw the remaining elements of the owl. chocolate buttercream, alternating it with cream. Place half a cookie in place of the eyes. Place chocolates on top of them.

Cake "Owl" made from fondant
An owl can be made from mastic in several ways. It is best, of course, to use mastic homemade. To do this, take one package of marshmallows and place it in a deep bowl. Add one tablespoon of butter and a teaspoon of lemon juice. Microwave for a few seconds until the marshmallows begin to melt. Now you need to add a glass of powdered sugar and half a glass of starch. As a result, a thick, homogeneous mass should come out, which is wrapped cling film and place it in the refrigerator for a day. In order for the mastic to be of different colors, you can buy food additives and add them along with powdered sugar. Before you form the owl on the cake layers, the entire cake must be covered with one layer of brown mastic, as in the photo below.

That's it, the owl cake is ready. Taking into account everyone technological processes It will take a little more than a day to prepare.
Cake in the shape of an owl: decorate with cream and mastic
Somehow I thought that you could decorate the cake for September 1st in a special way, for example, make it in the shape of an owl. Firstly, the owl is the personification of wisdom and knowledge, and secondly, owls are now extremely popular, as they say, in trend. In this article I have put together a master class for you on how to make a cake in the shape of an owl from mastic and cream.
Owl Cake
Cake in the shape of an owl made from cream
Not all housewives work with mastic, but cream decorations can be made by anyone who has baked a holiday cake on their own at least a couple of times. Yes, and the color of the owl allows you to make cream, without adding food coloring.
And so, the first cake. The diagram for laying out the cakes is in the first picture, then everything is simple: chocolate cream lubricate where the head and wings should be, as well as the twig, coat the tummy with regular butter cream, it will have a slightly yellowish tint. Still, a little mastic is used here to create the eyes, beak and legs of the owl. You can be creative and use, for example, round cookies, straws and other sweets. The owl's belly can be decorated with sugar flowers, which are sold ready-made in the confectionery departments of any supermarket.

Here's how to decorate cream cake chocolate chips made from white and dark chocolate.

And here is the whole cream owl cake, next to it is a diagram of how to cut and arrange the cakes.


And here is just an example of how to make cupcakes in the shape of owls from cream, the eyes and beak are made from candies.

In principle, it’s also not difficult to make a cake decoration from mastic. In most cases, you need to cover the cake with a sheet of mastic of the main color, then make circles that will serve as feathers for our bird. Well, actually below are a few photos of master classes.


But the cake is more complicated...


Cupcake in the shape of an owl
I also loved the idea of an owl shaped cupcake or bread for the kids. The whole point here is to correctly arrange the multi-colored pieces of dough. You can tint the dough with natural dyes: carrot and beet juice.